如何发布版本
本文主要介绍如何按照 Apache 的流程发布 Apache InLong 版本,相关说明和工具将遵守 ASF 的版本发布指南及 ASF 的发布政策,具体详情请参考以下链接:
对于二进制发布包,需要检查新版本里是否包含了 x类 的第三方依赖包,包括直接引用和间接引用部分,如果包含了,需要去掉后再发布版本
添加 GPG Key
本章节主要参考 Cryptography with OpenPGP, 仅对第一次发版本的 Release Manager 需要。
安装 GPG
详细的安装文档可以参考官网, Mac OS 环境配置如下
$ brew install gpg
# 检查版本,应该为2.x
$ gpg --version
生成 GPG Key
- 输入名字时最好与 Apache 中登记的 Full name 保持一致
- 使用的邮箱必须是 Apache 邮箱,建议先 gpg -k 查看所有 Key ID, 如果列表中第一个不是 apache 邮箱的 Key ID ,需要在后续步骤中指定 Key ID 来进行加密解密操作,参数为 -u
- 名字最好使用拼音或者英文,否则会出现乱码
$ gpg --full-gen-key
gpg (GnuPG) 2.2.20; Copyright (C) 2020 Free Software Foundation, Inc.
This is free software: you are free to change and redistribute it.
There is NO WARRANTY, to the extent permitted by law.

Please select what kind of key you want:
   (1) RSA and RSA (default)
   (2) DSA and Elgamal
   (3) DSA (sign only)
   (4) RSA (sign only)
  (14) Existing key from card
Your selection? 1 # 这里输入1
RSA keys may be between 1024 and 4096 bits long.
What keysize do you want? (2048) 4096 # 这里输入4096
Requested keysize is 4096 bits
Please specify how long the key should be valid.
         0 = key does not expire
      <n>  = key expires in n days
      <n>w = key expires in n weeks
      <n>m = key expires in n months
      <n>y = key expires in n years
Key is valid for? (0) 0 # 这里输入0
Key does not expire at all
Is this correct? (y/N) y # 这里输入y

GnuPG needs to construct a user ID to identify your key.

Real name: Guangxu Cheng # 这里输入你的名字
Email address: gxcheng@apache.org # 这里输入你的邮箱
Comment:                          # 这里输入一些注释,可以为空
You selected this USER-ID:
    "Guangxu Cheng <gxcheng@apache.org>"

Change (N)ame, (C)omment, (E)mail or (O)kay/(Q)uit? O #这里输入O
We need to generate a lot of random bytes. It is a good idea to perform
some other action (type on the keyboard, move the mouse, utilize the
disks) during the prime generation; this gives the random number
generator a better chance to gain enough entropy.
We need to generate a lot of random bytes. It is a good idea to perform
some other action (type on the keyboard, move the mouse, utilize the
disks) during the prime generation; this gives the random number
generator a better chance to gain enough entropy.

# 此时会弹出对话框,要求你为这个gpg输入密钥。
┌──────────────────────────────────────────────────────┐
│ Please enter this passphrase                         │
│                                                      │
│ Passphrase: _______________________________          │
│                                                      │
│       <OK>                              <Cancel>     │
└──────────────────────────────────────────────────────┘
#输入秘钥完毕后就创建好了。并会输出以下信息
gpg: key 2DD587E7B10F3B1F marked as ultimately trusted
gpg: revocation certificate stored as '/Users/cheng/.gnupg/openpgp-revocs.d/41936314E25F402D5F7D73152DD587E7B10F3B1F.rev'
public and secret key created and signed.

pub   rsa4096 2020-05-19 [SC]
      41936314E25F402D5F7D73152DD587E7B10F3B1F
uid                      Guangxu Cheng <gxcheng@apache.org>
sub   rsa4096 2020-05-19 [E]
上传生成的 GPG Key 到公共服务器
$ gpg --list-keys
-------------------------------
pub   rsa4096 2020-05-18 [SC]
      5931F8CFD04B37A325E4465D8C0D31C4149B3A87
uid           [ultimate] Guangxu Cheng <gxcheng@apache.org>
sub   rsa4096 2020-05-18 [E]

# 通过 key id 发送 public key 到 keyserver
$ gpg --keyserver pgpkeys.mit.edu --send-key <key id>
# 其中,keyserver 列表为:https://sks-keyservers.net/status/,为相互之间是自动同步的,选任意一个都可以。
查看 GPG Key 是否创建成功
可通过 https://pgpkeys.mit.edu/ 地址,可使用邮箱查询是否上传成功(大概需要一分钟)。
上传 GPG 公钥到 SVN 仓库
dev 分支的 svn 仓库:https://dist.apache.org/repos/dist/dev/inlong
release 分支的 SVN 仓库:https://dist.apache.org/repos/dist/release/inlong
请确认 dev 和 release 分支中增加的 key 相同
- 在 dev 分支中添加公钥到 KEYS,用于发布 RC 版本
# 这个步骤比较慢,会把所有版本都拷贝下来,如果网断了,用 svn cleanup 删掉锁,重新执行一下,会断点续传
$ svn co https://dist.apache.org/repos/dist/dev/inlong /tmp/inlong-dist-dev
$ cd inlong-dist-dev
# 追加你生成的 KEY 到文件 KEYS 中, 追加后最好检查一下是否正确
$ (gpg --list-sigs <key id> && gpg --armor --export <key id>) >> KEYS
# 接下来会要求输入用户名和密码,就用你的 apache 的用户名和密码
$ svn ci -m "add gpg key for YOUR_NAME"
- 在 release 分支中添加公钥到 KEYS,用于发布正式版本
$ svn co https://dist.apache.org/repos/dist/release/inlong /tmp/inlong-dist-release
$ cd inlong-dist-release
$ (gpg --list-sigs <key id> && gpg --armor --export <key id>) >> KEYS
$ svn ci -m "add gpg key for YOUR_NAME"
上传 GPG 公钥到 Github 账户
进入 https://github.com/settings/keys ,添加 GPG KEYS。如果添加后你发现这个密钥后面写了"未经过验证" (unverified),需要将 GPG key 中邮箱绑定到你的 GitHub 账户。
Maven 设置
在 maven 的配置文件 settings.xml 中,用正确的值替换下面的 <servers>/<profiles> 项:
<servers>
    <!-- Apache Repo Settings -->
    <server>
        <id>apache.snapshots.https</id>
        <username>{你的 Apache 用户 ID}</username>
        <password>{你的 Apache 用户密码}</password>
    </server>
    <server>
        <id>apache.releases.https</id>
        <username>{你的 Apache 用户 ID}</username>
        <password>{你的 Apache 用户密码}</password>
    </server>
</servers>
<profiles>
    <profile>
      <id>apache-release</id>
      <properties>
        <gpg.keyname>{你的 GPG Key ID}</gpg.keyname>
        <gpg.useagent>true</gpg.useagent>
        <gpg.passphrase>{你的 GPG Key 密码}</gpg.passphrase>
      </properties>
    </profile>
</profiles>
编译打包
以下 release_version 为即将发布的版本号,比如 1.6.0;rc_version 为 Releae Candidate,比如 RC0,RC1...;KEY_ID 是你创建的 GPG Key ID.
准备分支
修改 POM 版本号和 CHANGES.md,从版本主分支创建待发布分支。比如从
branch-1.6创建release-1.6.0。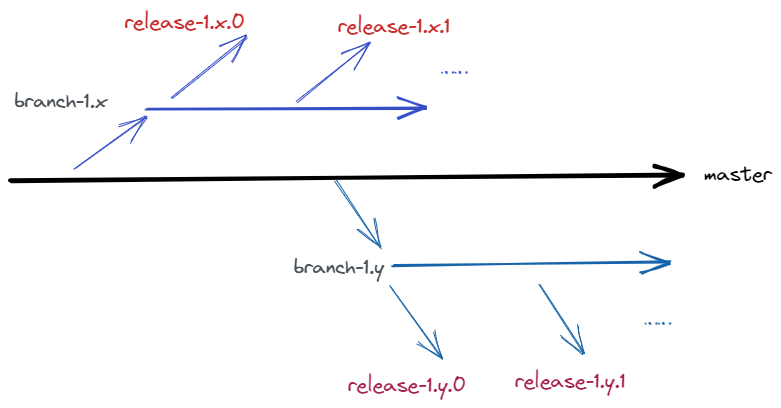
检查 release 分支代码是否正常,包括编译成功、单元测试全部成功、RAT 检查、Docker 镜像等
# 切换放到 release 分支
$ git checkout release-${release_version}
# build 检查
$ mvn clean package -Dmaven.javadoc.skip=true
# RAT 检查
$ mvn apache-rat:check
# Docker 镜像
$ mvn clean package -DskipTests -Pdocker
要确保代码已经检查无误,再进行下一步,包括编译成功、单元测试全部成功,RAT 检查成功等
创建 tag
创建一个带签名的 tag:
$ git_tag=${release_version}-${rc_version}
$ export GPG_TTY=`tty` && git config user.signingkey ${KEY_ID}
$ git tag -s $git_tag -m "Tagging the ${release_version} first Releae Candidate (Candidates start at zero)"
打包源码
$ mkdir /tmp/apache-inlong-${release_version}-${rc_version}
$ git archive --format=tar.gz --output="/tmp/apache-inlong-${release_version}-${rc_version}/apache-inlong-${release_version}-src.tar.gz" --prefix="apache-inlong-${release_version}/" $git_tag
上传 tag 到 git 仓库
# 在创建 tag 的源码目录执行
$ git push origin release-${release_version}
$ git push origin ${release_version}-${rc_version}
打包二进制包
# 进入源码包目录
$ cd /tmp/apache-inlong-${release_version}-${rc_version}
# 解压源码包
$ tar xzvf apache-inlong-${release_version}-src.tar.gz
$ cd apache-inlong-${release_version}
# 编译
$ mvn compile clean install package -DskipTests
# 拷贝二进制包拷到源码包目录下,方便下一步对包进行签名
$ cp ./inlong-distribution/target/apache-inlong-${release_version}-bin.tar.gz /tmp/apache-inlong-${release_version}-${rc_version}/
对源码包/二进制包进行签名/sha512
# 进入源码包目录
$ cd /tmp/apache-inlong-${release_version}-${rc_version}
# 计算 SHA512
$ for i in *.tar.gz; do echo $i; gpg -u ${KEY_ID} --print-md SHA512 $i > $i.sha512 ; done
# 计算签名
$ for i in *.tar.gz; do echo $i; gpg -u ${KEY_ID} --armor --output $i.asc --detach-sig $i ; done
检查生成的签名/sha512是否正确
具体可以参考:验证候选版本,比如验证签名是否正确如下:
$ for i in *.tar.gz; do echo $i; gpg -u ${KEY_ID} --verify $i.asc $i ; done
准备 Apache 发布
发布 jar 包到 Apache Nexus 仓库
# 进入源码包目录
$ cd /tmp/apache-inlong-${release_version}-${rc_version}/apache-inlong-${release_version}
# 开始上传,确保 settings.xml 为上面步骤已更新的文件
$ mvn -DskipTests deploy -Papache-release -Dmaven.javadoc.skip=true
上传编译好的文件到 dist
- 将 dist 仓库 checkout 到本地目录
# 这个步骤可能会比较慢,会把所有版本都考下来,如果网断了,用 svn cleanup 删掉锁,重新执行一下,会断点续传
$ svn co https://dist.apache.org/repos/dist/dev/inlong /tmp/inlong-dist-dev
- 添加源码和二进制文件并提交到 SVN 仓库
$ cd /tmp/inlong-dist-dev
# 创建版本目录
$ mkdir ${release_version}-${rc_version}
# 将源码包和签名包拷贝到此处
$ cp /tmp/apache-inlong-${release_version}-${rc_version}/*tar.gz* ${release_version}-${rc_version}/
# 检查 svn 状态
$ svn status
# 添加到 svn 版本
$ svn add ${release_version}-${rc_version}
# 检查 svn 状态
$ svn status
# 提交至 svn 远程服务器
$ svn commit -m "prepare for ${release_version} ${rc_version}"
关闭 Apache Staging 仓库
- 使用 Apache 账号登录 http://repository.apache.org
- 点击左侧的 Staging repositories
- 搜索 InLong 关键字,选择你最近上传的仓库
- 点击上方的 Close 按钮,这个过程会进行一系列检查
- 检查通过以后, 在下方的 Summary 标签页上出现一个连接,请保存好这个链接,需要放在接下来的投票邮件当中,链接类似
https://repository.apache.org/content/repositories/orgapacheinlong-{staging-id}。
- 如果 Close 操作失败,请检查失败原因并处理
- 如果出现
Signature Validation错误事件,可能是keyserver之间没有同步key,可以重新上传key到keyserver.ubuntu.com或keys.openpgp.org
Apache InLong 社区投票
发起投票
发送邮件到 dev@inlong.apache.org,投票模板为:
标题:[VOTE] Release Apache InLong ${release_version} ${rc_version}

内容:

Hello Apache InLong PMC and Community,

    This is a call for a vote to release Apache InLong version ${release_version}-${rc_version}.

    The tag to be voted on is ${release_version}-${rc_version}:

    https://github.com/apache/inlong/tree/${release_version}-${rc_version}

    The release tarball, signature, and checksums can be found at:

    https://dist.apache.org/repos/dist/dev/inlong/${release_version}-${rc_version}/

    Maven artifacts are available in a staging repository at:

    https://repository.apache.org/content/repositories/orgapacheinlong-{staging-id}

    Artifacts were signed with the {YOUR_GPG_KEY_ID} key, which can be found in:

    https://downloads.apache.org/inlong/KEYS

    ${release_version} includes ~ ${issue_count} bug fixes and improvements done since the last versions, which can be found at:

    https://github.com/apache/inlong/blob/${release_version}-${rc_version}/CHANGES.md

    Please download, verify, and test.

    The VOTE will remain open for at least 72 hours.

    [ ] +1 Release this package as Apache InLong ${release_version}
    [ ] +0
    [ ] -1 Do not release this package because...

    To learn more about apache InLong, please see
    http://inlong.apache.org/

    Checklist for reference:

      [ ] Download links are valid.
      [ ] Checksums and signatures.
      [ ] LICENSE/NOTICE files exist
      [ ] No unexpected binary files
      [ ] All source files have ASF headers
      [ ] Can compile from source
      [ ] All Tests Passed

      More detailed checklist, please refer to the following:
      https://inlong.apache.org/community/how-to-verify

Thanks,
Your InLong Release Manager
统计投票结果
发送邮件到 dev@inlong.apache.org,投票模板为:
标题:[RESULT][VOTE] Release Apache InLong ${release_version} ${rc_version}

内容:

Hello Apache InLong PMC and Community,

    The vote closes now as 72hr have passed. The vote passed with
    xx (+1 binding) votes from the PMC,
    xx (+1 non-binding) vote from the rest of the developer community,
    and no further 0 or -1 votes.

    The voting thread: {vote_mail_address}

    The release is accepted and will be published.

Thank you for your support.
Your InLong Release Manager
正式发布
将源码和二进制包从 svn 的 dev 目录移动到 release 目录
$ svn mv https://dist.apache.org/repos/dist/dev/inlong/${release_version}-${rc_version} https://dist.apache.org/repos/dist/release/inlong/${release_version} -m "Release ${release_version}"
然后确认 dev 下的 ${release_version}-${rc_version} 目录是否已被删除。
在 Apache Staging 仓库发布版本
- 使用 Apache 账号登录 http://repository.apache.org
- 点击左侧的 Staging repositories,
- 搜索 InLong 关键字,选择你最近上传的仓库,投票邮件中指定的仓库
- 点击上方的
Release按钮,这个过程会进行一系列检查
等仓库同步到其他数据源,一般需要24小时
更新官网文档和下载链接
更新下载页面的资源链接
创建 ${release-version} 对应版本的文档
发 ANNOUNCE 邮件,主送 dev@inlong.apache.org,抄送 announce@apache.org
请确保 Apache Staging 仓库已发布成功
登陆 https://downloads.apache.org/inlong/${release-version}/ 查看是否有安装包
宣布 release 邮件,模板为:
标题: [ANNOUNCE] Release Apache InLong ${release_version}

内容:

Hi all,

The Apache InLong community is pleased to announce
that Apache InLong ${release_version} has been released!

Apache InLong is a one-stop integration framework for massive data that provides automatic, secure,
distributed, and efficient data publishing and subscription capabilities.
This platform helps you easily build stream-based data applications.

This release contains a number of new features, bug fixes and
improvements compared to the last version released before.
The notable changes since ${release_version} include:

1. Feature-1
2. Feature-2
3. Feature-3
...

Please refer to the change log for the complete list of changes:
https://github.com/apache/inlong/blob/release-${release_version}/CHANGES.md

Apache InLong website: https://inlong.apache.org/

Download Links: https://inlong.apache.org/download

InLong Resources:
- Issue: https://github.com/apache/inlong/issues
- Mailing list: dev@inlong.apache.org

Thanks
On behalf of the Apache InLong community
GitHub 官网新增 release 包
- 进入 https://github.com/apache/inlong ,点击右侧 Releases 下 + 号, 然后点击 Draft a new release
- release title 为 ${release_version},上传 https://downloads.apache.org/inlong/${release-version} 下的所有文件到上传栏中再发布
发布后
清理本地临时文件
若以上步骤操作成功,说明版本发布顺利,可以清理本地临时文件,进行社区投票。
$ rm -rf /tmp/apache-inlong-${release_version}-${rc_version}/
$ rm -rf /tmp/inlong-dist-dev/
归档上一个版本的发布包
删除 release 目录下上一个版本的发布包,这些包会被自动保存在这里。
# last_release_version 为上一个版本号,可以访问 https://dist.apache.org/repos/dist/release/inlong/ 查看,比如 1.3.0
$ svn delete https://dist.apache.org/repos/dist/release/inlong/${last_release_version} -m "Delete ${last_release_version}"